
How to keep your mobile music system from running amok.
By Steve Oppenheimer
When electronic musicians talk tech, we usually focus on which gadgets are the coolest. We swap sound-design ideas and recording techniques and moan about lousy tech support. But somehow, no matter how many opinions we offer about what to buy, we rarely discuss how to assemble the system once we buy it.
That’s understandable, but it’s a big oversight. Systems design in general, and rack design in particular, are crucial in putting together a quality music production and performance environment. And if your stage or studio environment stinks, you have to work much harder to produce a quality product. When you take your act to the stage, a poorly designed system can lead to catastrophe. Technical tragedies can range from unacceptable noise and system failure to flaming equipment racks and electrocution. At various points in my career, I experienced all of these and more. (I once got blown some seven feet across an outdoor stage because of a poorly grounded system. I crawled back and finished the song on my knees!) But you don’t have to learn these lessons the hard way if you rack-mount your electronic brain the way the pros do.
To help you rack your brain, I consulted two top gear gurus. Nashville-based Ernie Bartschi is a refugee from New York City, where he was the rehearsal/equipment manager for SIR. Today, Bartschi’s ECB Sound creates custom touring and studio systems, with a special fondness for guitar systems. Programmer, engineer, and producer Bryan Bell is the president of SynthBank, a high-tech music-consulting firm. Bells clients include Branford Marsalis, Santana, Neil Young, and INXS, but he is best known for his association with Herbie Hancock.
What You Want
Nashville-based tech Ernie Bartschi creates custom touring and studio systems. A guitarist himself, he specializes in performing racks for guitar.
Although their approaches differ in some ways, Bartschi and Bell agree that the first step in planning your rack system is deciding how you will use it. First, consider whether you’re playing local dates or touring. If you’re hitting the road, it helps to know the length of the tour; whether you’re playing solo, with one band, or with several bands that have differing needs; and whether you need an entire system or just some sound modules and signal processors.
The size of the venues affects the mode of transportation, which in turn helps determine the type, size, and weight of your racks. Sometimes you need just a few synths for a quick gig, especially if the synths have onboard effects. Other times, you might need a full-blown package, with an integrated stage-monitor system.
Bartschi notes that your musical style is important: a country guitar-picker might not need the same extensive effects and complex signal routing required by a metal fretmaster. He also inquires about your musical responsibilities. Are you the only guitar player? Do you have to play rhythm and lead, and also trigger sequences?
Bell points out that touring players have another consideration: practicing and composing in the hotel room. If you’re on a club tour by bus or truck, you might be able to create a small rack for the hotel room that fits into the larger performance rack system at the gig. But if you’re doing stadium dates on a large concert tour, the crew needs to pack your rig into a semi-truck or airplane and head for the next city as soon as you finish a show. In this scenario, there’s no way you can use the same rack onstage and in the hotel room or tour bus.
Most musicians also must integrate their rigs into a studio. If you do dates at a pro studio, you usually rely on the studio’s board and effects processors. But unless you are sure of the studio’s available equipment, you’ll want your own sound sources. If you have a home studio, you probably use almost all of your live system there, possibly including a computer. Many musicians combine touring, pro recording, and home use, so flexibility is important.
One Musician, One Rack
If you want to address all of these needs, you have to make some choices. For Ernie Bartschi, a key is separating what you would like to have from what you really need. Then you can design a tightly integrated rack that does it all.
“Most people want everything in one rack-the mixer, preamps, processing, and synths,” says Bartschi. “I have no problem with that, to a point. It’s better to leave the power amps and such at your home studio and just take mixer, preamps, synths, and effects to the gig. If you’re touring with your own monitor system, you usually put the power amps in a separate rack to minimize noise and heat. Amp racks should be kept small because they tend to be heavy.”
With computers, Bartschi recommends keeping the monitor screen separated, in its own case, padded with 2-inch foam. Make sure the case has a rear door for cables and ventilation. “You can set the monitor on top of your main rack so it’s visible,” he notes, “while the rest of the computer hooks up in the main rack. Just keep it away from speakers and power amps.”
How many people will handle your rack system? If you’re working with a huge tour, for instance, you’ll have a professional crew and a forklift, so it’s a lot easier to use large racks. Such a system can be largely prewired, perhaps with multipin connectors, which makes it the easiest to set up. “Even then,” argues Ernie Bartschi, “keep it as relatively small as possible, so it’s easy to move. Your crew will hate you if they have to wrangle a 32-space rack. You’re better off with smaller racks. However, if all your components have to be in one rack, get an extra-deep rack, so some things are in front and some in back.” For many Bartschi clients, a 16-space rack is the maximum.
E Pluribus Unum

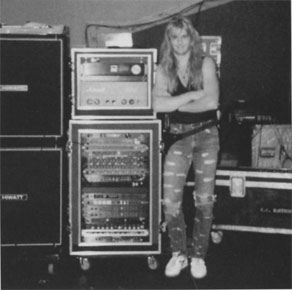
INXS drummer John Ferriss (left) with programmer, engineer, and producer Bryan Bell. Bell’s other clients include Branford Marsalis, Santana, Neil Young, and Herbie Hancock.
Most of us move our own gear, possibly with the help of one other person, or with a small, volunteer crew. Bryan Bell finds that even a his best-known clients have diverse uses for the same gear and often haul it themselves.
For example, if you were a hot session player in Los Angeles or New York in the I 970s, and your rack system could be handled in a 12-foot van with a lift gate, a service was hired to cart your gear to the venue. Today, you are usually expected to bring your own gear via private car or taxicab. So the minimum physical criteria for artists in this situation are the entrance to a car and the weight the artist can comfortably carry.
If you travel by van or truck, you might just have to load the racks onto a small hand truck and slip them through a standard, 29-inch building doorway. “But,” points out Bell, “don’t forget, you may have to get your rig upstairs, whether at the gig or upon returning home. Then, size and weight become huge factors.”
In Bell’s book, even four synths and samplers can be too heavy to carry, especially if they have hard drives. A sampler, DAT machine, and modular digital multitrack in one rack is also too much.
To deal with these realities, Bell designs systems consisting of several small racks, each of which is a functional block. For instance, the sound modules and MIDI processing can be put in one instrument rack. For an elaborate system, this might include a drawer for a drum machine or special MIDI device. It’s also a good idea to include direct boxes within the instrument rack. That way, if you don’t need to use your mixer, you can bypass it and get top-quality sound.
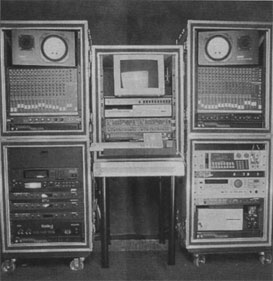
FIG. 1: Bryan Bell designed the Racks of Love to provide INXS drummer John Ferris wth a mobile composition system. Each rack can be used independently.
This system offers maximum flexibility. The synths’ audio signals usually don’t need to be mixed within their rack, as you would route them to the main PA. or studio console. For live work, you can use the synths’ onboard effects, and in the studio, you call use the studio’s effects. Thus, the instrument block is autonomous.
For example, Herbie Hancock has a one-space “guest artist” rig that he can carry in a taxi. Jan Hammer maintains a similar traveling rig. Thanks to careful planning and the sonic capabilities of modern synths and samplers, they have learned to do more with less.
For those times when his clients need their own mixing and effects, Bell creates a separate audio rack. This includes a mixer and all signal processors (except those in the synths). Although Hancock often takes just his instrument rig to a commercial studio, he also has an audio rack for submixing in his home studio and on tour.
One variation I have found useful is to mount a line mixer within the synth rack. Onstage, this provides a synth mixer for a compact, single-rack system. In the studio, it serves as a submixer, possibly even mixing devices outside the rack that connect via the patch bay.
For songwriters who tour extensively, Bell creates a third type of rack: the writing block. This rack contains the writing and digital components, such as a computer, a modular digital multitrack tape machine, etc. For example, on INXS’ recent tour, drummer John Ferriss wanted an extensive songwriting rig for his hotel room. To accommodate him, Bell designed a multitrack system dubbed “The Racks of Love” (see Fig. 1). The system’s instrument and audio/mixing modules can be integrated into the band’s stage setup, if necessary.
In addition, the Racks of Love include a composing/recording module that contains a Macintosh CPU with a Digidesign Pro Tools system, a hard disk, and a DAT recorder. Although Ferriss used this module in his hotel room, you could use the same method to add sequences and digital tape tracks to a live show. The main point is to design autonomous racks that can be interconnected as a system. (We’ll discuss interconnection schemes later.)
Choosing a Rack
Good rack systems start with a quality rack. That should be obvious, but I’ve seen many an expensive rig traveling in cheap racks that inadequately protect the precious cargo. No matter which brand you get, go for so-called “ATA” racks. The ATA rating once indicated that construction quality met the standards of the Airline Transport Association. (There is no (current official standard.) At one time, virtually all ATA racks were constructed of wood, often with a laminated surface. This is still the most popular style and is preferred by many professionals, including Bartschi. The classic Anvil case is a prime example of this type of construction.
Other pros, including Bell, prefer racks made of an extremely lightweight, corrugated plastic, such as Lexan or Lexalite. This type of construction is available from manufacturers such as Jan Al or SKB. The biggest advantage here is the dramatic difference in weight. However, you can’t drill holes in a plastic rack. Although I have heard of plastic racks cracking, have never seen it.
Seeking a compromise between appearance and function, Bell sometimes uses small Omnirax rack modules, with an oak-veneer finish, as inner racks. He places these in Lexan road cases, which gives him the “artsy” look of a wooden rack and the lightweight protection of high-impact plastic.
Shock Mounting
When loading and unloading, you’re often in a hurry to keep on schedule. Professional crews are especially under the gun, and even with top roadies, accidents happen. Therefore, if you’re taking your gear out of the house, a shock-mounted rack is an excellent investment, and it is an absolute must for touring. It is especially important to shock-mount processors, synthesizers, samplers, and anything with a hard drive.
There are at least three types of shock-mounting. The most common has 2-inch foam surrounding the inner frame, with an outside ATA case. Another style uses rails attached to rubber pin mounts in the rack. A third variety, used in SKB racks, uses a set of tightly coiled wires that act like a heavy spring.
The obvious purpose of the rack’s front and back covers is to protect its contents. But if you buy racks with deep covers, you also can make the lids carry something. The lids on INXS’ Racks of Love are deep enough to carry table legs, which attach to the lids, making them into tables. One lid also carries DAT tapes, and another holds the snakes. Every lid has a double purpose. By the way, for racks that will be rolled around, don’t forget to get top-quality casters, too.
Order Out Of Chaos
Having purchased the racks and decided what will go in each, you need to determine what goes where. The principle considerations here are balance and ventilation. You want the weight toward the bottom of the rack and balanced between front and rear, where possible. Even more important, you must have the proper airflow to keep your gear at its optimal operating temperature, despite stage lights and hot rooms, or sunlight for outdoor daytime shows.
Bartschi and Bell take somewhat different approaches when deciding the vertical location of rack-mounted devices. The two methods also have a lot in common, and they are equally valid. I’ll examine both and let you decide which you prefer.
A lot of equipment racks are front-loaded and clumsy. To help you balance the weight of the rack between the front and rear, look for items that can be rear-mounted. Power conditioners (discussed shortly) and small monitor amplifiers are natural candidates, but don’t overlook programmable, remote-controlled devices. If you program these devices from the computer and don’t need to see their screens during performance, you might be able to hide them in the rear.
Easy visual access also is a concern in many cases. Whether standing or sitting, you have to be able to see and get to certain items, such as mixers, a graphic EQ, and so on. Sometimes this overrides the other factors.
Cooling With Fans
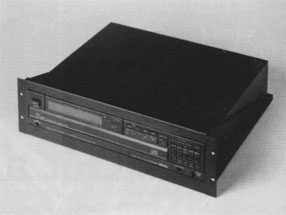
Middle Atlantic Products’ RSH-4 custom rack shelf lets you rack-mount such devices as this Sony CD changer without modifying the unit. The shelf is designed so the gear will not slip out during transportation.
Ventilation is primary consideration with racking tactics. Aside from the thermal effects of state lights, Bartschi’s clients often have heat-producing preamps and small monitor amps. Therefore, he often mounts a 3-rack-space fan to the rear rails, especially in racks with four or more devices. This combines with carefully placed vent panels, which help the fan draw air in the front and out the back.
“The old style was to pull cool air in toward the bottom of the rack and exhaust hot air out a vent at the top, but most guys don’t want a top vent anymore, notes Bartschi. “But you still need a vent space at the upper part of the rack and a fan in the middle of the rear.” The problem with a vented top is that moisture can enter. Instead, Bartschi prefers front vents in the top rackspace.
It is especially important to place vent panels immediately above major heat sources, such as power amplifiers and tube preamps. Some power amp models don’t have a built-in fan; even if this type of power amp has a big heat sink, Bartschi places a fan where it will blow into the back, with a vent directly in the front.
Standard, rack-mount P.A. fans run at a high speed, which is fine for cooling most gear. But tube preamps or rackmount Leslie tubes must be warm to the touch for the tubes to produce the desired tone. A variable-rate fan lets you adjust the fan speed to cool tube devices just enough that they don’t burn up.
Because he controls the airflow with a fan and vents, Bartschi’s decisions about what goes where are based primarily on weight, support, and access. For touring rigs, he tries to get the rack in an evenly balanced setup, so he avoids having deep pieces on top and shallow ones on the bottom. However, he does not necessarily place all of the gear in order from deepest to shallowest. Therefore, rear support is a big issue, especially when the rack is likely to bounce around during transport.
By using rear rack supports for the deepest gear. Bartschi can place individual items wherever convenience dictates. For example, if one piece is too close to another and causes noise, he has to do some swapping. “Trial and error is part of the game,” Bartschi muses. You can’t get frustrated. The end result is a rack that lasts.”
Cooling With Convection
Bryan Bell is not a big fan of fans. For one thing, they can be noisy, which is a drag when you take your rack back to the studio. Instead, he positions devices to create natural air currents. “I’m an air-space freak,” he admits. “I always leave open spaces in front and use vented rack panels to cover the holes. Besides, if you pack a rack too tightly, you can’t fix anything, it’s too heavy, you can’t reach anything, and you can’t add new gear later. The only time should fill all the spaces in the rack is you’re done buying new stuff, which you never are. I always leave one or two air spaces above the power supply in the audio rack, and even in the MIDI rack. Space equals lightweight.”
Because Bell’s ventilation scheme depends on natural convection, air flow is a key part of his stacking strategy. In this scheme, devices are stacked with the deepest units on the bottom and the shallowest on top. Combined with strategically placed vent panels, this creates the desired natural airflow.
Like Bartschi, Bell is concerned about weight distribution, and like his colleague, he will violate his stacking guidelines if a unit must be at the top for visual access.
Cables
Bad cables ruin good sound. You’ve gone this far, so spend the extra money to do it right. Which brand you buy is a matter of taste, as long as you use high-quality products.
You must be especially careful to separate cables that carry different types of signals. In an instrument rack, run power cables down one side, audio cables down the other side, and MIDI cables straight up the back. For a computer rack, run power and digital signals down the two sides and SCSI down the middle. For an amp rack, speaker cables go up the middle.
There are lots of ways to label your cables, including plastic numbers, gummed labels, or my old standby, marked masking-tape loops. It’s less important which you use, just so you clearly mark both ends of every cable.
Strain relief for your cables is extremely important, as is keeping your connectors from falling out during transportation, so tie down all cables-not just audio cables-with wire wraps or service loops and anchor them to the frame of the rack.
Interconnecting the Blocks
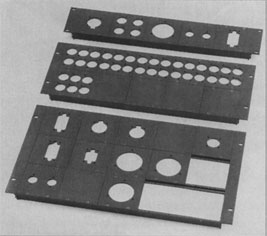
FIG. 2: Middle Atlantic Products’ UCP series modular panels let you assemble custom, rack-mount connector panels and cable pass-throughs. All hardware is flush, and all visible parts have a brushed, black anodized finish.
Now that you have clean well-designed racks, how do you integrate them with each other and with other systems, such as a studio?
Flexibility is a primary concern. You want to be able to handle all your studio and live gigs without rewiring your rig. In addition, you’ll need a fast, clean setup. Ideally, you should never have to reach inside the rack unless you’re effecting a repair. That means you need all your connections mounted on the rear rails. There are four common ways to do this: a patch bay, a custom-built patch panel, a multipin connector, and snakes or sets of individual cables that are connected to the individual devices inside the rack.
This last method is the cheapest way out, and it’s acceptable in a permanent installation, such as a studio. Many club musicians wire each piece directly because they don’t want to buy patch bays or never thought about it. But it’s clumsy and impractical to reach inside the rack and connect each piece every time you move it. We’ll focus on more professional approaches.
Commercial studios often use patch bays with Tiny Telephone (TT) connectors. These provide top fidelity and, because of their small size, let you fit more wiring in less rack space. However, this solution is not so good for traveling rigs and home studios, because you need custom cables and snakes to interface the TT connectors with the 1/4-inch phone jacks used on most synths and semipro effects processors.
A more common solution is to use patch bays with 1/4-inch connectors on every rack. This provides the ultimate in flexibility, as you can access the vast majority of mixers and musical instruments and many effects processors without using adapters.
Alternatively, you can buy blank panels and jacks, or custom, premounted jack panels from such vendors as Mid Atlantic (see Fig. 2). With this approach, you can make up your own patch panels that mix different types of connectors. Never drill through the rack; mount the sockets on the panel. As an extra touch, Bell sometimes uses hinged connector panels that swing out 90 degrees to expose the wiring.
To make your life easier and your connections cleaner, you can buy short, high-quality guitar or instrument cables and cut them in half. Solder the wire ends to the custom patch panel and plug the other end into the rack-mounted devices. This takes advantage of the cables’ professionally soldered connectors and strain relief.
The racks can be connected via 8- or 16-channel, multiconductor snakes, with fan-outs and 1/4-inch connectors. Sometimes you can use separate cables loomed together into custom snakes. In INXS’ tour rig, the patch panels were professionally wired, but the interconnects were simply loomed cables. This lets the tech staff change the inter-rack cabling arrangement quickly to address unexpected problems.
In some situations, you may have to split the audio signal path. This approach lets you feed the mains and an onstage monitor system or recording rig. If your rack is completely self-contained, or will be traveling on an extended tour, you can hardwire a split signal path. But most of the time, it’s still better to use patch bays with normals. This lets you connect everything in the rack to anything outside of the rack. The mixer (or audio rack, in Bell’s system) is also wired to patch points, and the synths are normaled to the mixer.
Multipin connectors are not necessarily the best choice for traveling club rigs, as they don’t allow a lot of flexibility and could leave you in a bad way if a pin gets damaged. However, Bartschi notes that for an extended tour-say, six months-you can hardwire the rack gear to a multipin connector for the ultimate in rapid setup and teardown.
Multipins also can be a good way to interconnect studio racks, and you could take advantage of this to integrate your live rig into your home studio. In this case, use a hardwired split or a patch bay to send identical signals to an Elco 96-pin or similar connector (for the studio connection) and the patch bay (for the stage rig).
Thanks to companies such as Pacific Radio and David Carroll Electronics, an increasing number of professionally wired multipin-connector options are available. Bell advises that if you have an extensive rig-say, $10,000 worth of gear-it’s worth a few extra bucks to investigate these options rather than risking it bad soldering job by rolling your own.
Getting Juiced
Clean, regulated power and proper grounding should be a major concern for every studio and stage application. As Bell puts it, “There’s no such thing as clean audio without clean power.” Power and grounding fundamentals have been discussed several times in EM (see the two-part series “On Solid Ground” in the September and October 1992 issues and “Noise Killers” in the October 1994 issue). We’ll just touch on a few specific issues here.
First of all, make sure the wall outlet or other house power source is properly wired and grounded. “On Solid Ground, Part 1” explains how to check this. If the house power is badly miswired, and the venue’s manager or owner won’t call in an electrician (or let you call one), blow off the gig! Yes, I can hear you muttering about that option, but if the AC isn’t properly grounded, everything you have-including your body-could get blown off, and all the line conditioning in the world won’t help.
Speaking of line conditioning, a power conditioner is mandatory for live or studio work. Don’t even think about playing live without AC protection of some sort, and if possible, put a power conditioner in each rack. Most people use a standard line conditioner/power distributor, which protects against surges and spikes and filters out radio frequency (RF) and electromagnetic (EM) interference.
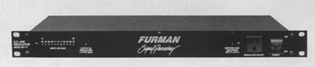
FIG. 3: It’s best to have a power conditioner in every rack. The satellite racks’ basic power conditioners should be plugged into a full-blown line regulator such as the Furman AR-117. This guarantees that even if the power drops as low as 90V or surges as high as 140V, your gear will receive a clean 117 VAC.
However, as your friendly local senior editor, I strongly urge you to use a full-blown line regulator, such as the Furman AR-117 (see Fig. 3). This makes sure that even if the power drops as low as 90V or surges as high as 140V, your gear will receive a clean 117 VAC (again assuming the house power supply is properly grounded). As Ernie Bartschi says, “Touring without it line regulator is like building a race car and forgetting to put the wheels on.”
As with studio electrical systems, it’s best to have one ground source for everything. Bartschi follows tile classic professional technique of grounding the mixer, which is the center of the system, to the main power supply and floating the other components’ chassis grounds. This is a job for a pro; don’t attempt this if you aren’t absolutely sure you know what you’re doing.
Bryan Bell prefers to power his racks with Juice Goose RP300 power conditioners, because they are reliable, adapt to multinational power standards, and offer individual ground lifts. That way, you don’t have to modify your gear to avoid ground loops. Bell used these power conditioners when setting up Lee Ritenour’s studio and solved some thorny grounding problems in just a few minutes. (Unfortunately, the RP3O0 is no longer available, but it’s possible the manufacturer would bring them back if enough people wanted to buy them.)
Power your rack with heavy-gauge AC cables (12 gauge, 3-conductor at least). Good connectors are important, too. Bartschi recommends that you rackmount a 20 amp, twist-lock, Bryant or Hubbell 3-pin power connector. (Hubbell connectors are available at most electrical supply houses.) Between the connector and the cable, you’re looking at $50 for a secure power line. You have to drill a mounting hole out of a 2-space rack panel and flush-mount the connector.
There are two schools of thought about how to keep gear from grounding to the rack racks. “Noise Killers” covers it method that relies on plastic shoulder washers or Humfree insulators. A variation on this theme is to run strips of electrical tape along the rack rails, though this rarely insulates the screw holes. The other school says that with modern gear, you rarely have to worry about insulating from the rack. You pay your money and take your choice.
Odds and Ends
We’re racked and ready to rock, except for a few points. First, consider the advantages of rack drawers for parts, drum machines, recording media, etc. Use Velcro to anchor anything that goes in a rack drawer. Drawers that hold any type of audio or data storage media can be completely lined with mu metal, so that when locked closed, they are protected from magnetic flux. This is doubly important if your rack might get x-rayed, such as when going through customs.
Finally, Bartschi absolutely insists that his clients take ten minutes out of their music day to do their homework. “I take it for granted that you will put the research time in, collect articles, and study them, so you’re approaching your gig with a pro attitude. Take your time. If you have a question about any of this stuff, and you’re not sure how to proceed, call the tech, read EM articles, and call the manufacturer for technical advice. Don’t give up; be relentless. If you call and get a bad attitude, try another day, because you’ll be the winner when you get it sorted out.”
Okay, class is dismissed for the day. It’s time to go out and play!