By Steve Oppenheimer
Why hard drives fail and what to do about it.
What is the most mission-critical and the most fragile item in your studio? Not your prized high-end microphone – you could survive without that – and not the lead singer’s ego. No, your hard drive is the most fragile and failure-prone item, and its unexpected loss could be lethal to any project. A drive failure can bring your studio operations to a full stop – unless you’re prepared.
So get ready for the inevitable. You’ll need to know a bit about how hard drives work, what makes them fail, how to reduce the failure rate, and what to do when your drives finally fail.
Under the Hood
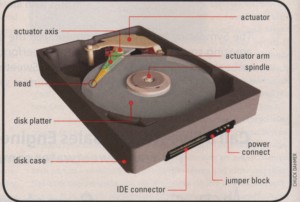
FIG. 1: Basic parts of a typical hard drive include the platter, actuator, read/write arm, and spindle.
Hard drives are sophisticated, precision machines, and their designs have improved greatly over the years (see Fig. 1). I’ll touch on a few aspects of contemporary drive architecture that will help you understand the reasons for failure and ways of averting or dealing with it (for more details, read the Wikipedia article at http://en.wikipedia.org/wiki/Hard_drive).
A hard drive records data on from one to five flat disks called platters. The platters are held in place by a spindle and rotate at high speed, driven by a motor. Most platters are made from glass or an aluminum alloy and are coated with two parallel layers of a magnetic cobalt-based alloy, separated by a 3-atom-thick layer of nonmagnetic ruthenium. The two main layers are magnetized in opposite orientation, reinforcing each other.
Floating nanometers above (but not touching) the rotating platter’s surface, the drive’s microscopic read/write heads detect and alter the magnetic pattern that stores the data. One head, containing both the read and write elements, serves each platter surface. The read/write head is mounted on a light, rigid actuator arm that moves the head to the correct position above the platter. The arm is moved by a voice-coil actuator that, like a loudspeaker, utilizes a coil and a magnetic field. The air close to the platter moves at or close to the platter speed and acts like a bearing, preventing the head from touching the platter. Each platter’s magnetic surface is logically divided into many small regions, each of which stores a binary unit of information.
Of course, a drive also contains a circuit board and firmware to operate all these parts and to encode and manage the data. Modern drives have an onboard RAM cache that buffers between the speedy computer and the slower hard disk. A sealed case with a filtered vent hole (to equalize air pressure) encloses the entire mechanism. There’s much more to the internal workings of a drive, but these parts most directly affect our discussion.
Physical Failure
Hard drives can fail due to physical problems or logical problems. Although you can’t prevent most failures, if you discover a problem in time, you might be able to power down and have a chance to salvage your data (see the online bonus material, “When Disaster Strikes,” at emusician.com). Here are a few of the physical reasons that drives fail:
Head crash. Head crashes are a common cause of drive failure. They usually occur when the actuator arm swings too close to the surface of the platter and touches it, potentially damaging the platter and the read/write heads. In some cases, the arm just falls out of position, and the heads and platter remain intact, or the platters collide or stick together. You almost certainly can’t fix this yourself.
Heat damage. Heat is another leading cause of drive failure. Heat can burn out a circuit board, cause the platter to expand and damage the magnetic surface, and alter the distance from the read/write heads to the platters. And that’s just for starters!
Motor failure. If the drive motor fails, your drive will not spin or will spin at a degraded and unpredictable speed. You can’t prevent this, but you might hear the motor speed waver in time to power down.
Other damaged components. A broken read/write arm, scratched platters, and bad drive bearings are deadly. All sorts of things can cause them: impact damage, a head crash, heat, dust getting inside the case, a defective part, and so on. Baby your drives: don’t bounce them around, pad them well if you transport them, and of course, don’t drop them.
Water or fire damage. These are obvious drive killers. Enough said.
Logical Failure
Hard drives can also fail due to logical problems, such as:
Bad drive sectors. Bad sectors are less of a problem with modern drives than with older models, but when they appear, you should be concerned. If the number of bad sectors has increased even slightly since the previous time you checked, it’s time to replace the drive.
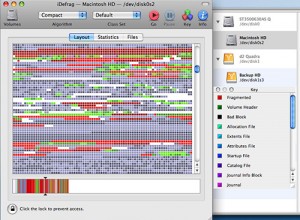
FIG. 2: This screen from Coriolis Systems iDefrag 1.6.4 for Macintosh shows parts of files scattered about. This is called fragmentation.
Disk fragmentation. When you save or modify a file, the operating system looks for sufficient free disk space to store the data. The same thing happens when the OS and applications overwrite old files and write new ones, including temporary files and updaters. If the OS can’t find enough contiguous space, it has to break the file into pieces—fragments—that can fit in the available free blocks of space. Over time, pieces of files and applications are increasingly scattered across the disk; this is called fragmentation (see Fig. 2).
When you delete a file, it isn’t erased; it is deleted from the directory, allowing the computer to gradually overwrite those blocks. This can create fragments. Since they require large blocks of free space, large audio and video files become fragmented far more quickly than smaller files.
A directory, stored on the disk, keeps track of the fragments. When the computer opens a file, it directs the drive to find and reassemble the parts into a coherent file. This happens on the fly, constantly, at very high speed. The more fragmented a hard disk becomes, the harder the drive has to work to find the scattered pieces. This creates heat and stresses fragile, precision parts. Eventually, it can cause the drive to fail. Therefore, defragmenting is an important aspect of drive maintenance.
True disk optimization is different from defragmentation. Optimization organizes related files and files that are commonly accessed together into logical groups for faster access. For instance, applications will launch faster if the files they require are located together, so the drive doesn’t have to work hard to find them. Note that I’m talking about organizing how the files are physically stored on the platters, not what folders or directories they appear in on your desktop. All of this is behind the scenes. For information on defragmenting and optimizing software, see the online bonus material, “Shattered!”
Computer viruses. Viruses can wreak havoc on a drive.
Corrupt firmware or bad RAM. Even firmware that isn’t burned into a chip can get screwed up over time. The RAM cache is usually SDRAM, and like any memory, it can be damaged. You can’t do much about this problem.
Warning Signs
If you see any of these signs of imminent drive failure, stop using the drive immediately (see the online bonus material, “When Disaster Strikes”).
Your computer takes a long time to boot or hangs completely. Slow boots could be caused by factors other than drive problems, such as a corrupt operating system or simply having your OS launch a lot of programs at startup. A somewhat sluggish boot disk might just need to be defragmented. But a very long boot time or failure to boot generally indicates that a drive is encountering read/write failures. Minimizing the number of programs that automatically launch at startup will enable you to more easily notice slow boot times.
A disk utility reveals bad disk sectors. The disk-utility software might be able to fix the bad sectors, but as noted earlier, if the problem reappears and increases, your drive is dying.
The drive is hot to the touch. All drives get warm, but if a drive is noticeably hot, it is working way too hard and is about to die.
The “click of death.” Any odd sound such as clicking, knocking, whistling, or grinding is a bad sign. A clicking sound – the so-called “click of death” – often indicates a read/write error during a seek. This usually is due to a mechanical failure that causes the head actuator to click as the drive attempts to recalibrate. If the drive hasn’t crashed, it’s about to.
Cyclic redundancy errors. Computers have an error-checking procedure to validate that a file has been copied correctly. A cyclic redundancy error indicates that the computer cannot make an accurate copy. This could indicate a bad disk sector or something worse: damaged read/write heads, bad RAM cache, or dust that is damaging the platter.
Preventive Medicine
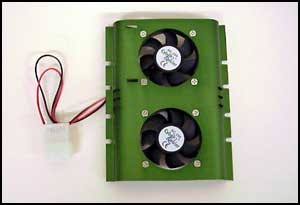
FIG. 3: This double-fan hard-drive cooler ($7.95) from Computer Fan Outlet (www.computerfanoutlet.com) sports twin 50x50x10 mm fans.
Since there is usually no cure for a crashed drive, data safety is all about prevention to the extent possible and preparation for the inevitable. Here are a few tips.
Save often, back up faithfully. You never know when your drive will fail, so take no chances. Save open files whenever you have a moment. Back up at least daily or be prepared to lose your work. For more about backup, read the online bonus material, “Get Back” and Mike Levine’s feature “Better Safe than Sorry,” in the May 2006 issue of EM (http://emusician.com/gencomput/emusic_better_safe_sorry), online at emusician.com.
Leave free space. As your drive fills up, the OS will have a harder time finding large contiguous blocks, so fragmentation is increased. In addition, defragmentation software needs free space to move file fragments, and optimization requires more free space.
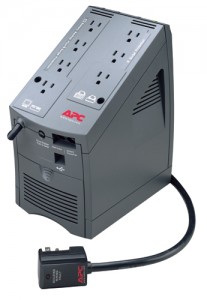
FIG. 4: The APC Back-UPS LS 700 is a quality uninterruptible power supply with surge, spike, and sag protection; automatic voltage regulation; and an assortment of bells and whistles.
Complete defragmentation with the Windows XP Disk Defragmenter requires at least 15 percent of the drive be available, and that’s a good, if generous, guideline. Some utility programs can defragment drives with less free space, but it’s wiser not to push your drive to the limit. You can check available space in Windows by right-clicking on a drive and choosing Properties. For Mac OS X, use the Activity Monitor application (in the Applications folder) and choose Disk Usage.
Keep cool. You know those pictures of happy people using laptop computers in full sun on a hot beach? They won’t be so happy if their internal drives fry. Keep drives away from heat sources, and make sure that they’re well ventilated. If needed, you can buy additional cooling fans (see Fig. 3). You also can monitor the temperature of your hard drive with SMART-savvy software (discussed in a moment).
Feed clean power. You can’t perform your best if you eat lousy food, and neither can your drives. Power surges, spikes, and sags endanger your drive’s health, so use a quality power conditioner that includes filtering and surge/spike protection. I recommend getting an uninterruptible power supply like APC Back-UPS LS and RS series (www.apcc.com; see Fig. 4). A UPS supplies temporary power in the case of a power failure, and the Back-UPS LS and RS models feature automatic voltage regulation (AVR), which delivers 120 VAC regardless of the incoming voltage.
Give it a rest. Some pros recommend keeping a hard drive running all the time because powering up and down is more stressful than continuous operation. Others say that if you’re not using the drive, turn it off to avoid wear and tear. I generally prefer to leave my computer running when I’m home but power down when I’m leaving for several hours.
If you are going for a few hours and want to leave your computer running, you can give your drives a chance to cool by letting them sleep. Windows users can enable “hard disk power off” under Power Management or just hibernate the computer, which will power down the boot disk. Mac users can select System Preferences>Energy Saver, click Show Details, and check “Put the hard disk(s) to sleep when possible.” If, having returned from a short break, you try access your drive and get a spinning beach ball, make sure you unchecked the sleep option.
Let it be. Moving or tilting a hard drive while powering up is dangerous to its health.
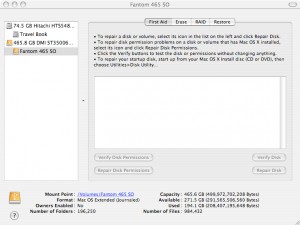
FIG. 5: Apple’s Disk Utility comes free with OS X and offers a number of important features, including verification and repair of the disk and of disk permissions.
Perform regular maintenance. Make preventive maintenance a part of your weekly routine. Use disk-utility software to detect and fix a variety of disk problems, such as corrupt file directories and bad sectors. Don’t wait until your computer slows down and you suspect a problem.
Mac OS X comes with Disk Utility (found in the Applications folder), which enables you to verify and repair the disk and the disk permissions (see Fig. 5). Win XP includes Chkdsk; to use it, choose Start>Run, and then type chkdsk.exe. You can also use third-party Mac and Windows disk utilities, which often offer more features (see the online bonus material, “Your Utility Belt”).
Get SMART. SMART (Self-Monitoring, Analysis and Reporting Technology) is built into many modern hard drives. It monitors more than 35 attributes of drive performance, including temperature, calibration, bad sectors, spin-up time, and the distance between the heads and the platter. You need SMART-savvy disk-utility software (seeFig. 6) to access this information (see the online bonus material, “Your Utility Belt”).
Defragment. I’ve discussed defragmentation and optimization. For more information, see the online bonus material, “Shattered.”
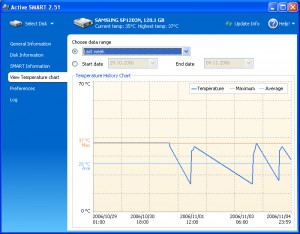
FIG. 6: Utilities such as Ariolic Software ActiveSMART 2.51 can use SMART technology to report on the condition of a hard drive. Here you see a graph representing a drive’s temperature history.
Mac OS X: Ensure that the OS does its maintenance routines. OS X automatically performs certain background maintenance tasks that can affect your boot drive. By default, these tasks are scheduled for 3:15 to 5:30 a.m., and if your computer is shut down or asleep, the maintenance can’t be done. In that case, reschedule these tasks or run them manually using a third party programs such as Atomic Bird Macaroni 2.1.1 ($9.99;www.atomicbird.com/macaroni) or Brian R. Hill’s MacJanitor 1.3 (free; http://personalpages.tds.net/~brian_hill/macjanitor.html). You also can run the maintenance tasks using the Terminal application.
Don’t record audio projects to your boot disk. Because audio files are large, and we edit them extensively, the drive where you store audio files can become fragmented relatively quickly. In addition, audio drives in studios work long and hard. If you record to a drive other than your boot drive, it will be easier to mind your audio drive’s health, and your boot drive will last longer.
Go on a RAID. If you have a professional project studio and can afford the investment, consider using a RAID 1 disk array for critical audio file storage. (For more on RAID, see the online bonus material, “Mirror, Mirror.”)
Tighten it up. If you have an internal drive that is acting a bit strange – say, it’s constantly spinning – check to make sure the drive is fully seated, all contacts are clean, and all connections are tight.The Rest of the Story
There is much more to say about hard-drive failure and data safety, so I’ve provided five useful sidebars in the online bonus material: “When Disaster Strikes” (emergency data recovery), “Shattered” (defragmentation and optimization), “Get Back” (file backup options), “Your Utility Belt” (disk utilities for Mac and Windows), and “Mirror, Mirror” (RAID).
This should give you enough information to begin a drive-maintenance program and to prepare for the evil day you know is coming. I suggest you start now—remember, back up first—because nothing in life is certain except death and hard-drive failure.
[Sidebar 1]
When Disaster Strikes
Let’s assume your drive has failed or, if you are fortunate, you have detected the early warning signs and shut the drive down. Unfortunately, this tragedy occurred before you were able to back up the day’s work. You will need to replace the drive, but what about your data?
If the drive has completely failed, then you can’t recover your data yourself. Only a data-recovery professional has the specialized tools, environment, and skills to do the job. There is one possible exception to this, but it’s a real long shot (see the section “Chill Out”).
If the drive still operates but is clearly about to fail, you can try to recover the data yourself or you can turn to a data-recovery company. It’s time to contemplate the importance of your endangered data.
Go to a Pro
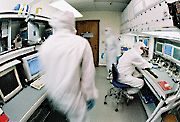
FIG. A: Data-recovery companies employ highly skilled technicians who work on hard drives in contaminant-free clean rooms.
If you were to lose your work completely, would it cause you great emotional pain, financial loss, and damage to your studio business? If so, you probably need to take the drive to a professional to recover your data. It’s going to cost you – the tab for data recovery can easily be $1,000 and more – but it’s your best hope. A data-recovery engineer will open your wounded drive in a clean-room environment and will try to temporarily revive the drive just long enough to recover the data (see Fig. A).
The drive won’t be stable; you can’t put it back in service. The data-recovery pro could have one shot at recovering the data before the repair fails. But a pro is far more likely to recover the critical data than you are, and if you attempt it and are unsuccessful, you probably will further damage the drive, making it less likely that a data-recovery company can help. Attempting to recover the data yourself is a high-risk game.
Do It Yourself
If you want to salvage the data but you don’t want it badly enough to pay for a data-recovery service, then you can try to recover it yourself. Again, we’re assuming the drive is functioning. Your data-recovery software (see the sidebar “Your Utility Belt”) might only get one brief opportunity before the drive fails completely.
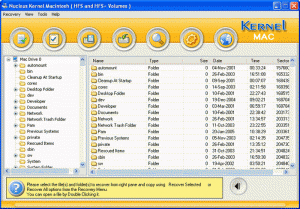
FIG. B: Data-recovery programs such as Nucleus Kernel for Macintosh can help you recover lost files – if the drive remains stable long enough.
Above all, do not – repeat, do not! – attempt to open the drive case. The drive is sealed to keep all dust and other environmental contaminants out, and dirt, dust, scratches, or moisture will put an end to any chance of recovery. Hard drive mechanisms must be repaired (if repair is possible) in a special dust-free environment called a clean room. Even your mama can’t make your room this kind of clean. Besides, we’ve already established that you can’t repair the mechanism. All you can achieve by opening the case is make a bad situation hopeless.
Having put down the screwdriver, install your data-recovery software on a separate drive. If the damaged drive was your boot drive, boot your computer from another drive or install the problem drive and the recovery software on a different computer. You will also need a drive with sufficient capacity to store the recovered data.
With drives mounted, launch and run the data-recovery software (see Fig. B). Note that data-recovery software often makes the already-damaged drive work hard, so you might not have much time before the drive dies. Do not scan the drive for problems; scanning is hard on the drive, and you’ve already decided that you can’t fix it. Launch the data-recovery routine as soon you get the drive running, and if you recover your data, back up immediately. If it works, be very thankful.
Chill Out
If the drive has failed, and you want to try to recover your data yourself, there is one trick you can try. It is risky and only works in a few situations, if at all. You can freeze your drive. Yes, that’s right, put it in the freezer! I haven’t tried this, and most experts recommend against it, but some admit that it might work. If you are attempting to recover data from an older drive that has had a head crash or a spindle failure, and you’re desperate, it could be an option.
Here’s how it works, in theory. If the actuator arm has fallen out of position but not yet touched and ruined the platter, cooling can cause the metal to shrink enough to bend the arm back into place temporarily. The chilled platters and spindle also shrink, unsticking the platters and pulling the surfaces away from the heads, restoring the gap between heads and platter. Another situation where freezing might help is if the spindle bearings are damaged. Again in theory, freezing the spindle makes the bearings’ sleeve more viscous, and the extra resistance helps the whole assemble stay centered and reduces vibration.
If freezing gets your drive working, it won’t work for long. Freezing is far more likely to cause further data loss and damage to the drive. But if your drive is dead, and you’d like to save your data but aren’t willing to pay a data-recovery company, it’s your last-ditch option.
[Sidebar 2]
Shattered!
Defragmentation moves file fragments and free space to contiguous blocks so that the read head doesn’t have to jump around to read the files. Optimization goes a step beyond defragmentation by organizing all of the defragmented files in a particular order calculated to maximize performance.
OS X and Windows XP and Vista automatically defragment to some extent, but they do it in different ways, and the results are not always thorough. Therefore, it pays to check your disk periodically and defragment it when needed. Mac users will need third-party software to do this; Windows comes with a defragmenter, but some third-party utilities offer more options and do a more thorough job.
OS X Files
According to Apple, you don’t need to defragment with Mac OS X. In a nutshell, Apple’s key arguments are that since drive capacity is large, fragmentation is less of an urgent issue. The Mac OS HFS Plus formatting avoids using space from deleted files. With faster drives and RAM caches, many applications rewrite an entire file rather than continually appending data to existing files, reducing fragmentation. Caching also helps the system get around minor fragmentation problems.
In addition, OS X 10.3 (Panther) and later can automatically defragment files using a technology called Hot-File-Adaptive-Clustering. However, Hot-File-Adaptive-Clustering affects only files under 20 MB in size, which means most audio and video files are not defragmented. In addition, some types of read-only files are not moved by this technology, whereas some third-party programmers can move these files. The bottom line is that drives still can get fragmented under OS X, and it’s wise to check them periodically with a disk utility that supports defragmentation.
Incidentally, Mac OS X can detect the files you use the most and move them to an area on the disk called the Hot Zone in order to improve access time. It’s not exactly optimization, but it’s a step in that direction. (For a full explanation, see the document “About disk optimization with Mac OS X” athttp://support.apple.com/kb/HT1375. Note that this refers to defragmentation, not true optimization.)
Repairing Windows
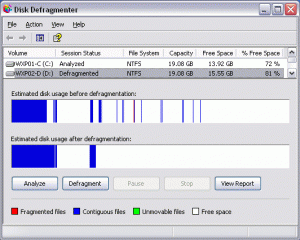
FIG. C: The Windows XP Disk Defragmenter shows the fragmentation of a drive before and after defragmentation.
XP and Vista have a form of automatic defragmentation and optimization, which works differently than in Mac OS X. If it detects fragmentation, Windows defragments and moves the files every three days, placing most-used files together, in a contiguous section toward the outer edge of the disk, reducing seek time.
Unlike Apple, Microsoft thinks users should still periodically defragment their drives. Therefore, Windows XP and Vista come with Disk Defragmenter (see Fig. C), a stripped-down version of Diskeeper Corporation’s Diskeeper. Windows XP’s Disk Defragmenter can be launched by using Start>All Programs>Accessories>System Tools>Disk Defragmenter. Disk Defragmenter moves all the directory information to one spot in the center of the data, reducing read/write head travel. It moves infrequently used files further from the directory area, and it follows a user-provided table of file descriptions to emphasize or ignore. Finally, it makes the files contiguous.
The Windows Vista version of Disk Defragmenter can automatically run at scheduled times, using Task Scheduler, and it can continue to defragment in the background when the computer is in use. You can’t choose which drives to defragment unless you install Windows Vista Service Pack 1. If the fragments of a file are over 64 MB in size, the file is not defragmented (Microsoft says this wouldn’t noticeably improve performance). On the other hand, Disk Defragmenter can defragment a volume without requiring a lot of free space. (Full defragmentation, including large files, requires at least 15% of free space on the volume.)
XP and Vista also include a command-line Defrag.exe utility. The Windows Vista version of Defrag.exe doesn’t require administrative rights and offers more control than Disk Defragmenter. It can defragment user-selected volumes or just analyze volumes like the Windows XP version.
Both Disk Defragmenter and Defrag.exe have limitations that very inexpensive third-party defragmentation and optimization utilities can address, so it’s worth checking out the alternatives.
Defrag Procedures
Before you defragment your drive, you should keep a few things in mind. First, defragmentation does carry some risks, so back up your data if you haven’t already done so. Of particular importance to musicians, defragmenting sometimes wipes out disk-based software authorization, so if your music software uses this sort of copy protection, make sure you have serial numbers and original program disks or downloadable installers handy just in case. Dongle-based copy protection should not be affected.
Mac OS X only: before defragmenting, use Apple’s Disk Utility to repair permissions. Then use a specialized utility such as MacJanitor to run Mac OS X maintenance tasks. (For more on this, read “Mac OS X: How to Force Background Maintenance Tasks” athttp://support.apple.com/kb/HT2319.)
Regardless of your OS, run your disk utility to check and repair the disk directories and general disk structure before you defragment. Now use your disk utility of choice to defragment or optimize. Afterward, run your disk utility again to ensure there are no more problems. Mac OS X users should also run Repair Permissions one more time.
[Sidebar 3]
Get Back
You already know your drive is going to fail sooner or later, so back up your data often. A good rule of thumb is, if you can’t afford to lose the file, back it up absolutely as soon as possible – say, while the band is getting ready for the next song. If you would be sad to lose it but not distraught, back it up daily. If you don’t back up daily, be prepared to lose the day’s work.
Simple backup is fine for most data files. You’ll probably need to back up session files to a large-capacity hard drive or tape drive, since the files are so large. You might be able to archive small projects on a few DVD-Rs or Blu-ray discs. But what about the drive containing your applications and application-specific libraries? Sure, you can reinstall applications, Reason Refills, GarageBand Jam Packs, and so on, but you will want them organized in a specific way, including application preferences, and trying to replicate that after your main drive crashes can be a nightmare.
One solution is to get a second drive (internal or external) with the same capacity as your working drive and create a mirror image (a clone) of your working drive on the second drive. If you are backing up a boot drive, your clone can be made a bootable volume. Having created a clone, continue to synchronize your drives with incremental backup software (with incremental backup, only files that have changed are copied). When one drive fails, you can simply switch to the other and keep working. You probably will still have to reinstall software that has disk-based copy protection, but for the most part, this is a great way to go.
A wide assortment of cloning and backup utilities is available for Mac OS X and Windows, and I’ve just listed a few. A clone is an exact copy of a volume, including invisible files, permissions, metadata, and other data. If you clone your boot drive, you get a bootable copy. The Finder and some backup programs can’t copy all file types (invisible files, for example), but cloning software can. Not all backup utilities can create bootable volumes, so check before you buy.
OS X 10.5.x (Leopard) includes Time Machine, which backs up your files every hour but doesn’t create bootable volumes. If you want to use Time Machine, check out Time Software’s TimeMachineEditor 1.3.1 (free; http://timesoftware.free.fr/timemachineeditor), which lets you schedule Time Machine backups in case hourly backup is overkill.
You’ll find Windows XP’s Backup utility and Vista’s Backup Status and Configuration program in Accessories>System Tools. Backup is installed by default on XP Pro, but XP Home users must manually install it from the install CD. Backup is a basic backup program and, like its Vista counterpart, can’t make a bootable clone.
For more about backup, including links to software and services, see Mike Levine’s story “Better Safe Than Sorry” in the May 2006 issue of EM, available at http://emusician.com/gencomput/emusic_better_safe_sorry.
Mac OS X Backup and Cloning Programs
Econ Technologies ChronoSync 3.3.5. ($30; www.econtechnologies.com)
EMC Retrospect 7.5 Professional for Mac ($129; www.emcinsignia.com)
Free Ride Coding SmartBackup 2.2.5 ($23; www.freeridecoding.com)
Mike Bombich’s Carbon Copy Cloner 3.1.1 (donation requested; www.bombich.com/software/ccc.html)
Skorpiostech Changes 1.0.4 ($40; www.changesapp.com)
Shirt Pocket SuperDuper ($27.95; www.shirt-pocket.com/SuperDuper)
Windows Backup and Cloning Programs
Acronis True Image 11 Home ($49.99; www.acronis.com)
Drive Snapshot 1.3 ($62.89; www.drivesnapshot.de/en)
EASEUS Disk Copy 2.0 (freeware; www.easeus.com/disk-copy)
EMC Retrospect 7.5 Professional for Windows ($129; www.emcinsignia.com)
Macrium Reflect 4.2 (Free Edition available; $39.99 Full Edition; www.macrium.com)
PC Inspector Clone Maxx (free; www.pcinspector.de)
Spotmau WinCare Clone Genius ($39.95; www.spotmau.com)
Symantec Ghost 14.0 ($69.99; www.symantec.com)
Terabyte Unlimited Image for Windows 2.15 ($38.94; www.terabyteunlimited.com)
[Sidebar 4]
Your Utility Belt
Batman has a utility belt, and you could use one too. Here’s a small sampling of third-party disk-utility software for hard-drive care and maintenance. You can easily find many more disk-utility programs of all sorts with a Web search. And of course, Windows and OS X come with some utility programs, which are discussed in the “Crash and Burn” article.
The third-party programs listed here offer a variety of features. Several use SMART to monitor hard-drive performance – including data-transfer rate, access time, error checking, and temperature – and to predict possible drive failure. Some programs handle formatting, defragmentation, and optimization and can do a variety of repairs. Others are focused entirely on data recovery. A few more general-purpose utilities go far beyond drive maintenance.
Mac OS X Disk Utilities
Alsoft Disk Warrior 4 ($99.95; www.alsoft.com/DiskWarrior/index.html)
Atomic Bird Macaroni 2.1.1 ($9.99; www.atomicbird.com/macaroni)
Brian R. Hill’s MacJanitor 1.3 (free; http://personalpages.tds.net/~brian_hill/macjanitor.html)
Coriolis Systems iDefrag 1.6.4 ($34.95; http://www.coriolis-systems.com/iDefrag.php)
Micromat Tech Tool Pro 4.6.2 ($98; www.micromat.com) Version 5 may be available by the time you read this.
Nucleus Kernel for Macintosh ($145; www.datarecoverymac.com)
Stellar Phoenix Macintosh Data Recovery Software 1.0 ($129 download, $149 CD; www.stellarinfo.com)
Windows Disk Utilities
Ariolic Software ActiveSMART 2.51 ($29.95; www.ariolic.com/activesmart)
Diskeeper Corp. Diskeeper 2008 (Home version $29.95; Professional $49.95; www.diskeeper.com/defrag.asp)
EFD Software HDTune (v.2.55 freeware; HDTune Pro 3.1 $34.95; http://hdtune.com)
Flobo Hard Disk Repair 1.0 ($39; www.floborecovery.us)
Get Data Recover My Files 3.9.4 ($59.95; www.recovermyfiles.com)
Gibson Research SpinRite 6.0 ($89; www.grc.com/sr/spinrite.htm)
Nucleus Kernel Recovery FAT-NTFS ($69; www.windowsdatarecovery.com)
Stellar Phoenix Windows Data Recovery 3.0 ($99 download, $119 CD; www.stellarinfo.com)
URL Toy Software Personal SmartCheck 3.1 ($19.95; http://www.urltoy.com)
[Sidebar 5]
Mirror, Mirror
A RAID (Redundant Array of Independent Disks) combines two or more hard drives to produce a device that your computer sees as a single volume. RAIDs are more reliable and offer better read/write performance than most individual drives. A true RAID is an integrated hardware device with a controller that handles the demanding task of distributing the data among the component disks. In a software RAID, software pairs independent drives into a RAID array, and your CPU has to distribute the data.
There are several types of RAID arrays, but the two most often seen in less-expensive consumer drives are RAID 0 and RAID 1. Our interest here is data safety, and that’s the purpose of a RAID 1 array, in which pairs of mirrored disks redundantly store duplicate data. If one disk fails, you can access the data from the other. More important, because the same data is written simultaneously to both disks, the system can do advanced error-checking, better ensuring the data’s integrity. Although a RAID 1 array does supply a sort of emergency safety backup, it does not obviate the need for regular routine backup, as something could happen to the entire array. And of course, with two drives, the chances increase that one will fail.
A RAID 0 array stripes the data across several disks, which produces superior speed and full capacity, obviously valuable for multitrack recording. However, this type of RAID does not provide the data safety of a RAID 1; you don’t get the advanced error checking, and if one disk in a RAID 0 array fails, all data is lost.
If you need and can afford the best of both worlds, check out RAID 5 and the less common RAID 6 arrays, which use more disks to provide both data safety and speed. For more on this subject see the article at http://en.wikipedia.org/wiki/RAID.
